indicator / indicators
Axiom RSI Osc STR
Five independent RSI slots, a weight-gated blend, and pivot divergence, Keltner, BBWP, and Donchian context computed on that blend — all inside RSI's native 0..100 frame.
Crypto / Forex +4 / 1m / 5m +5
indicator / indicators
Three independent RSI slots, one native 0..100 pane, a weight-gated blend, and a single global repaint switch. Multi-timeframe RSI context without stacked-RSI clutter.
Last updated: Jun 1, 2026
Crypto / Forex +4 / 1m / 5m +5
Free access
Read everything on this page first. Open it on TradingView only when you are clear on what it does and what it does not do.
Open in TradingViewYou need a TradingView account for tools that open or run on TradingView.
These tools support analysis, testing, planning, and review. They do not make trading decisions for you.
Explore the details to see whether the tool fits the problem you are trying to solve for.
Three RSI slots, one pane, one native 0..100 axis. Each slot carries its own source, timeframe, smoothing, and weight, and a weight-gated blended RSI sits on top with a matching blended signal line so you can see where the stack agrees and where it does not.
The decision this tool is built for is narrow on purpose. You are trying to read whether RSI across the two or three timeframes you actually watch is lined up enough to act — without being fooled by a higher-timeframe bar that has not closed yet, and without collapsing the stack into a single smoothed line that happens to agree with the trade you already wanted.
Axiom indicator families use a Base -> CTX -> STR progression when the full set exists. Base is the focused/free version: three chart-symbol slots, one global repaint posture, and the smaller MA/filter surface where that family uses one. CTX expands that same RSI logic into ten slots with optional per-slot tickers, per-slot timing control, deeper Power User controls, and the broader MA/filter surface. STR sits after CTX: it keeps the stronger per-slot control pattern, reduces the stack to five slots because of the added computation, and spends that budget on divergence, Keltner, BBWP, and Donchian structure around the blended RSI output. This page covers Base, so reach for it when the three-slot chart-symbol RSI read is enough.
There are three places you carry the trust load. The On Bar Close? switch is global here — ON waits for each higher-timeframe bar to close; OFF reacts sooner and can repaint until that bar closes. The blended line is a weighted average of the slots you configured, which makes it a context read, not a verdict. The optional master smoothing pass trades reactivity for calm, and that tradeoff shows up at the midline cross.
RSI stays on its own axis. Fifty still marks equilibrium, and the seventy and thirty guides still mean what your muscle memory expects.
On Bar Close? switch. One control sets the repaint posture for every slot at once. ON returns the previous confirmed higher-timeframe value for each slot. OFF returns the live higher-timeframe value. Both behaviors are the real choice — the switch names the cost of each.5 / 15 / 60 stack sits in a comfortable reading range.5, 15, 60, weights 33.3 / 33.3 / 33.3, source close, RSI length 14, RSI smoothing 3 (SMA), signal smoothing 3 (SMA), overbought 70, oversold 30, master smoothing off.On Bar Close? OFF, then back ON, and watch a replay. ON should hold the higher-timeframe slots steady between confirmed higher-timeframe updates. OFF should let them move before the higher-timeframe bar closes; on historical bars, treat that OFF-mode view as repaint-exposed hindsight rather than proof of what you would have seen live.From there, adjust timeframes, weights, and smoothing to match the stack you actually trade.
Per slot (RSI 01 / 02 / 03)
Enable RSI 0X — slot on/off. Disabling a slot removes it from the blend entirely.Hide RSI 0X Plot — hides the slot's line but keeps it contributing to the blend. Use when the pane is crowded but the slot should still steer context.Source: — the price series the slot's RSI reads. Default close.TimeFrame: — the slot's timeframe. Must be greater than or equal to the chart timeframe; blank inherits the chart timeframe. Defaults 5, 15, 60.RSI Length: / RSI Smoothing: / RSI Type: — raw RSI lookback, extra smoothing applied before plot, and the MA family for that smoothing. Defaults 14, 3, SMA.Signal Length: / Signal Type: — smoothing length and MA family for the slot's signal line. Defaults 3, SMA.Blended Weight: — how much the slot steers the blend. Default 33.3. Set to 0 to keep the plot and alerts without moving the blend.Line Width: — default 2.Oscillator (general)
Overbought Level / Oversold Level — default 70 and 30. These drive the dashed guides and the stretched-condition framing for every slot and for the blend.Display
Plot Blended RSI/Signal — shows or hides the blended pair and the fill. Default on.Blended Line Width: — default 3.Master smoothing (post-blend)
Enable Master Smoothing — adds one MA pass to both blended lines after the blend. Default off.Master MA Type — default EMA.Master Length — default 3.PU (Power User)
On Bar Close? — one global switch covering every slot. Default ON. ON waits for each higher-timeframe bar to close before returning a value (slower, confirmed). OFF uses the live higher-timeframe value (faster, can repaint until that bar closes). There is no per-slot override in this trim.What to watch out for
On Bar Close? OFF to feel faster and then trading the unconfirmed read before the higher-timeframe bar closes. The cost of OFF is real, not cosmetic.33.3 / 33.3 / 33.3 as an impartial starting point. Equal weights are a starting point, not a neutral answer — they still bias toward whichever slot is moving most.Master Length until the blend finally crosses 50 and then calling the delayed cross confirmation.Ten alerts are compiled. Every one is gated on confirmed chart bars and reports a current state at the close of the chart bar. These are not cross events or flip events.
RSI 01 Is Bullish / RSI 01 Is Bearish — slot 01 RSI is above / below its slot signal on a confirmed chart bar.RSI 02 Is Bullish / RSI 02 Is Bearish — slot 02 state on a confirmed chart bar.RSI 03 Is Bullish / RSI 03 Is Bearish — slot 03 state on a confirmed chart bar.Blended RSI Is Bullish / Blended RSI Is Bearish — blended RSI is above / below the blended signal on a confirmed chart bar.All RSI Slots Bullish / All RSI Slots Bearish — every enabled slot agrees on a confirmed chart bar.Worth naming plainly: the in-file script header mentions state-flip alerts and midline or threshold-cross alerts for the blend. The compiled code does not include those. The copy here tracks what actually ships. If flip or midline alerts are added in a later version, this listing will change with them.
The bar-close gate on the alerts applies to the chart timeframe. It does not cancel intra-bar movement on the underlying higher-timeframe reads when On Bar Close? is OFF — the alert still fires at chart-bar close, but the state it reports depends on the repaint posture you chose.
The blend is a weighted average, not a score. It walks the active slots, skips any slot whose weight is zero, skips any slot whose value is unavailable, and produces a weighted average for the RSI series and the signal series. A slot you set to zero weight still plots and still fires alerts, but it does not move the blend. If every effective weight ends up at zero — every slot disabled, zero-weighted, or missing data — the blend goes blank by design rather than drawing a placeholder that looks like data.
Master smoothing is one MA pass over the blended lines, applied after the blend. It trades reactivity for calm. The midline cross arrives later with this pass on than with it off; that is the trade it is making, not a glitch.
On your own chart: set RSI 01 to weight 100 and zero out the others, and the blend should track RSI 01 exactly. Then zero all three weights and the blend should go blank.
Why did a slot jump when the higher-timeframe bar closed?
That is On Bar Close? doing its job in ON mode. When ON, each slot returns the previous confirmed higher-timeframe value, so the slot line steps to a new value at each higher-timeframe bar close. If you prefer a slot line that reacts earlier in the bar at the cost of repaint exposure, OFF is the choice. Neither is the wrong answer — they are different postures, and this tool lets you name which one you are running.
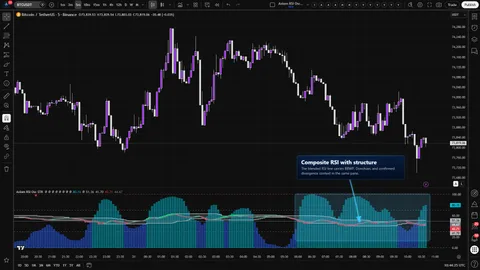
What is the blended line actually telling me? It is a weighted average of the active slots' RSI values, with a matching weighted average of their signal values alongside it. It is a compact context read across your stack. It is not a score, not a probability, and not a verdict. The per-slot plots stay visible next to the blend so you never have to read the line without being able to check which slot is carrying it.
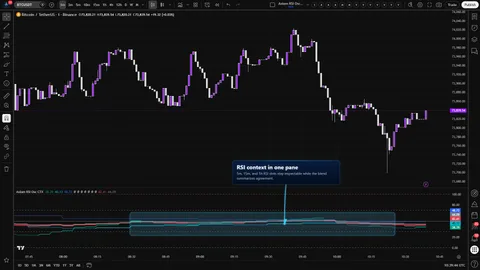
Can I still read 70 and 30 the way I read them on a normal RSI? Yes. Each slot's RSI is standard RSI on the slot's timeframe — no normalization, no re-scaling, no hybrid axis. The pane is native 0..100, the 50 midline is 50, and the overbought and oversold guides default to 70 and 30 because those are the numbers your muscle memory already knows.
Can I confirm one slot but keep another reactive?
Not in the Base trim. On Bar Close? is one global switch here and it governs every slot at once. Per-slot repaint control lives in CTX and STR. If that matters to you, choose CTX for ten-slot context breadth or STR for five-slot blended-line structure — the Base page is not the right landing for that feature set.
What happens to the blend if I zero every slot's weight? It goes blank. The blend is weight-gated; when every effective weight is zero, there is nothing to average, so the plot deliberately does not draw. The per-slot lines still plot, so the pane is not empty — the blend simply stops pretending to have an answer.
On Bar Close? for all three slots. Per-slot repaint control is a CTX and STR feature.AxiomMovingAverageLibraryLite v1 supports SMA, EMA, RMA, WMA, VWMA, and SWMA for per-slot smoothing, signal smoothing, and the master smoothing pass. SWMA uses TradingView's fixed ta.swma() behavior rather than the length input.Find documentation, walkthroughs, and support routes on the AxiomCharts website.
This indicator is a decision-support tool. It does not issue buy or sell signals, does not guarantee outcomes, and does not replace risk management. Markets involve risk, including the loss of capital. Past behavior on historical data is not a prediction of future results. You are responsible for your own trading decisions.
If this one is close but not quite right, there may be a better fit nearby for the same kind of chart work, testing need, or workflow gap.
indicator / indicators
Five independent RSI slots, a weight-gated blend, and pivot divergence, Keltner, BBWP, and Donchian context computed on that blend — all inside RSI's native 0..100 frame.
Crypto / Forex +4 / 1m / 5m +5
indicator / indicators
Ten independent RSI slots, one native 0..100 pane, a weight-gated blend, and an honest repaint switch per slot. Multi-timeframe and multi-symbol context without stacked-RSI clutter.
Crypto / Forex +4 / 1m / 5m +5
indicator / indicators
Free
Three independent Stochastic slots, one native 0..100 pane, a weight-gated blended K and D pair, and a single global repaint switch. Multi-timeframe Stoch context without stacked-Stoch clutter.
Crypto / Forex +4 / 1m / 5m +5
Tell us what you are trying to accomplish and we will help you narrow it down honestly.